
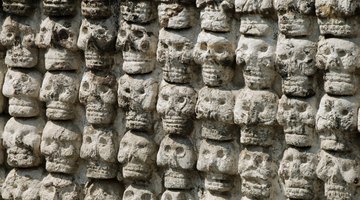

What are Aztec Death Whistles?
Aztec whistles of death are skull-shaped whistles that emit an eerie shriek when blown into. Hundreds had been collected and dismissed as toys, until Roberto Velazquez, a mechanical engineer who has devoted his adult life to researching and recreating the sounds of ancient whistles, brought attention to the cultural significance of the whistles. Aztec whistles of death are classified as a member of the aerophone family because the sound is produced by air vibrating within the instrument. They are known to have origins from Mexico and Mexico City, using Mayan technology and craft. Said to have sounds that mimic a wind god, these screaming whistles have been used in psychological warfare in the pre-columbian era.
These replica whistles can be made using DIY methods, like making clay whistles or mouthpieces, or by 3D printing techniques and can be made in one day. These whistles replicate and imitate the sounds of human sacrifice and human screams. This mexicolore whistle is similar to musical instruments, but can be more of a resonator. Like many fine arts instruments, this whistle has to be used in a certain way to get the specific sound out of it. There are plenty of full video tutorials for these whistles online to check out, but here are our best tips for creation.
How to Make an Aztec Death Whistle:
1. Shape the Clay
Shape the Sculpey terracotta clay into a small palm-sized ball by rolling it between your hands. Squeeze the ball gently with your fingers on the sides to flatten and elongate the ball slightly.
2. Roll a Tube
Roll a separate tube of clay that is about 2 to 3 inches in length and 1/2 inch in diameter. Attach the tube to the top of the ball of clay by gently pressing and smoothing the edges of the tube into the top of the ball.
3. Combine
Insert the clay shaper into the tube slowly until it goes into the center of the ball. Slowly extract the shaper. Make a large hole at the bottom of the ball and hollow out the inside using the bullnose texturizing/sculpting tool.
4. Shape a Ball
Make another smaller ball of clay by rolling it between your hands. This ball should be small enough to fit inside the larger ball with excess space around it. Cut this ball in half using the sculpting wire. Hollow out the inside of both halves of this smaller ball with the bullnose tool.
5. Create a Hole
Fit the two halves together loosely and poke a hole in the top with the taper tool. Open the ball up again and clean up any loose clay. Fit the ball back together and smooth the seam gently, creating a hollowed-out ball with a hole at the top.
6. Insert Ball
Insert the hollowed-out ball into the larger one. Line up the hole of the hollow ball with the hole from the tube on the larger ball. Leave a small gap between the tube hole and the hollow ball. Affix the smaller ball inside the larger one by smoothing the edges of clay together.
7. Sculpt the Face
Sculpt the face of the larger ball to resemble a skull using the bullnose tool and the toothpicks to define shapes and create relief.
8. Bake
Preheat the oven to the temperature specified on the Sculpey package. Place the whistle on the cookie sheet. Bake for the amount of time specified on the package. Allow to cool completely.
9. Paint
Paint the finished whistle with the paints and paintbrushes.
Tip
Moisten the clay with the spray bottle filled with water if it begins to become difficult to work with.
Make sure the hole leading up the tube is clear of loose pieces of clay.
More clay may need to be added or used as a patch to fuse pieces together or fix holes.
Warning
Be gentle when handling the hollowed-out clay, it may want to "deflate" if handled roughly.
Keep clay moist until it is baked to avoid cracks from forming.
Do not overbake.
Related Articles


References
Resources
Writer Bio
Gabrielle Black has been a professional writer, artist and designer since 2002. Her theatrical designs, puppet design and construction have been featured in "Theatre Design & Technology" magazine and she has written numerous articles for various websites. She holds a Bachelor of Arts from Luther College and a Master of Fine Arts from the University of Idaho, both in stage design and painting.